Odd Review

AvatarReview with Different Overview

20 Way To Increase Your Alexa Traffic Rank

Here is a collection of methods you can use to boost your Alexa Rank. Most of these tips are derived from several fellow webmasters I know who claimed to have derived positive results through their experiments with the Alexa Rankings.

Some of the other tips were derived articles and sources, which I have duly referenced at the end of this post.

Do these tips work? According to some, yes they definitely do work. But do note that most of them require active effort of some sort and hence, they will work as long as long as you are consistently performing specific actions.

To increase your Alexa rank in the long run, I would highly recommended that one focus on developing quality content which attracts and maintains a large audience instead of purely focusing on artificially increasing your Alexa Rank.

Great link-worthy content will leads to an natural increase in site traffic and is an excellent way to passively increase your Alexa rank.

It is important to emphasize that you should devote most of your efforts in growing your site audience alongside integrated implementation of any of the following tips below.


  1. Install the Alexa toolbar or Firefox’s SearchStatus extension and set your blog as your homepage. This is the most basic step.
  2. Put up an Alexa rank widget on your website. I did this a few days ago and receive a fair amount of clicks every day. According to some, each click counts as a visit even if the toolbar is not used by the visitor.
  3. Encourage others to use the Alexa toolbar. This includes friends, fellow webmasters as well as site visitors/blog readers. Be sure to link to Alexa’s full explanation of their toolbar and tracking system so your readers know what installing the toolbar or extension entails.
  4. Work in an Office or own a company? Get the Alexa toolbar or SS Firefox extension installed on all computers and set your website as the homepage for all browsers. Perhaps it will be useful to note that this may work only when dynamic or different IPs are used.
  5. Get friends to review and rate your Alexa website profile. Not entirely sure of its impact on rankings but it might help in some way.
  6. Write or Blog about Alexa. Webmaster and bloggers love to hear about ways to increase their Alexa rank. They’ll link to you and send you targeted traffic (i.e. visitors with the toolbar already installed). This gradually has effects on your Alexa ranking.
  7. Flaunt your URL in webmaster forums. Webmasters usually have the toolbar installed. You’ll get webmasters to visit your website and offer useful feedback. It’s also a good way to give back to the community if you have useful articles to share with others.
  8. Write content that is related to webmasters. This can fall in the category of domaining and SEO, two fields in which most webmasters will have the Alexa toolbar installed. Promote your content on social networking websites and webmaster forums.
  9. Use Alexa redirects on your website URL. Try this: http://redirect.alexa.com/redirect?www.doshdosh.com . Replace doshdosh.com with the URL for your website. Leave this redirected URL in blog comments as well as forum signatures. This redirect will count a unique IP address once a day so clicking it multiple times won’t help. There is no official proof that redirects positively benefit your Alexa Rank, so use with caution.
  10. Post in Asian social networking websites or forums. Some webmasters have suggested that East Asian web users are big Alexa toolbar fans, judging by the presence of several Asia-based websites in the Alexa Top 500. I suggest trying this only if you have the time or capacity to do so.
  11. Create a webmaster tools section on your website. This is a magnet for webmasters who will often revisit your website to gain access to the tools. Aaron Wall’s webpage on SEOTools is a very good example.
  12. Get Dugg or Stumbled. This usually brings massive numbers of visitors to your website and the sheer amount will have a positive impact on your Alexa Rank. Naturally, you’ll need to develop link worthy material.
  13. Use PayperClick Campaigns. Buying advertisements on search engines such as Google or Exact Seek will help bring in Traffic. Doubly useful when your ad is highly relevant to webmasters.
  14. Create an Alexa category on your blog and use it to include any articles or news about Alexa. This acts as an easily accessible resource for webmasters or casual search visitors while helping you rank in the search engines.
  15. Optimize your popular posts. Got a popular post that consistently receives traffic from the search engines? Include a widget/graph at the bottom of the post, link to your Alexa post or use Alexa redirection on your internal URLs.
  16. Buy banners and links for traffic from webmaster forums and websites. A prominent and well displayed ad will drive lots of webmaster traffic to your website, which can significantly boost your rank.
  17. Hire forum posters to pimp your website. Either buy signatures in webmaster forums or promote specific articles or material in your website on a regular basis. You can easily find posters for hire in Digital Point and other webmaster forums.
  18. Pay Cybercafe owners to install the Alexa toolbar and set your website as the homepage for all their computers. This might be difficult to arrange and isn’t really a viable solution for most. I’m keeping this one in because some have suggested that it does work.
  19. Use MySpace . This is a little shady so I don’t recommended it unless you’re really interested in artificially inflating your Alexa Rank. Use visually attractive pictures or banners and link them to your redirected Alexa URL. This will be most effective if your website has content that is actually relevant to the MySpace Crowd.
  20. Try Alexa auto-surfs. Do they work? Maybe for brand new sites. I think they are mostly suitable for new websites with a very poor Alexa rank. Note that there be problems when you try to use auto surfs alongside contextual ads like Adsense. They aren’t also long term solutions to improving your Alexa Rank so I suggest using with caution.

source : DoshDosh

Read More..
Increasing TrackBack

If you are currently blogging, you should also be utilizing the TrackBack feature to drive targeted traffic back to your site. ;)

There seems to be confusion among many bloggers about TrackBacks – how to do it, what it is, etc. Bascially, the TrackBack is a system implemented by many blogging tools that allows a blogger to see who has seen one of their posts and written another entry concerning it.


The way it works is that a ‘ping’ is sent from one blog to the other, which generates a TrackBack. The TrackBack usually appears below a blog entry and shows a brief summary of what has been written on the target blog, together with a URL and the name of the blog.
The way this can benefit your affiliate links is that you can search for blog postings on a particular subject as the various blog search engines, like Feedster, Technorati, and Daypop.
Or you could go to your favorite blogs on certain subjects and check what they are writing about today.When you find a blog posting that is relevant to something you are trying to promote, you can write a commentary that touches on both the subject on the other blog and the product you are promoting.
Trackbacks are good because  they bring traffic to your blog :) when you trackback other blogs. And if someone trackbacks your posts, it is good too because it means that the other blogger has read your blog and found something interesting in your blog. And depending on the blogging software, there is a good probability that they also made a direct link to your blog while trackbacking your post.  So to summarize
  • Trackbacks bring targeted traffic to your site, and posibility increase your number of loyal blog readers.
  • Trackbacks create high quality relevant incoming links and possibly increase your site ranking in search engines.
  • Trackbacks share your ideas on the topic with the original author.
  • Using Trackbacks is an easy way to let the world know about your website.
 Warning - be sure you are writing a quality posting – if a site sees that you’re making a transparent attempt to get a link on their site, they can and will remove your TrackBack.


Source: info-scrapur
Read More..

How To Install Google Analytics

Google Analytics Blogger LogoWouldn’t it be nice to know how many people actually visited your blog each day? How about knowing which of your posts are the most popular? Well surprisingly Blogger doesn’t currently offer any native blog analytics but fortunately there is Google Analytics — available for free.

Google Analytics is a great tool that will show you all sorts of useful information about how people found your blog, keywords they searched on to find you, where they came from and even how long they stayed. You’ll learn more about where your visitors come from and how they interact with your blog. This is a must tool if you are trying to build a profitable blog otherwise you are flying blind!
This article will show you how to add Google Analytics to your Blogger blog. It’s a fairly simple process and doesn’t require any technical skill at all.


Step #1 – Setup a Google Analytics Account

Go to Google Analytics and sign in using your Blogger login. If your account doesn’t work for some reason, you can create a new one instead. Once you login you’ll see a screen that looks like this:


Google Analytics Blogger Sign Up Step 1
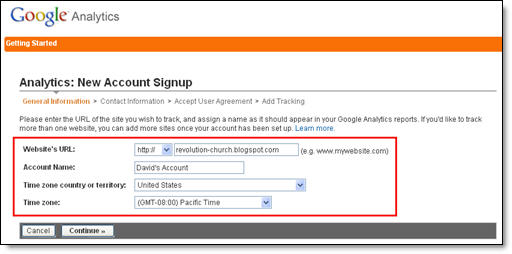
Click on the “Sign Up >>” button and proceed to the next step which will ask you for your general information. Website URL, Account Name, Country, and Time Zone. The screen will look like this:


Google Analytics Blogger Step 2
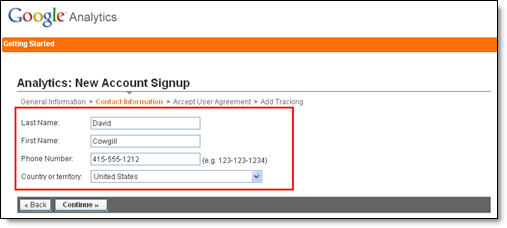
If you noticed, I just put my Blogger url (without the http://) and called it “David’s Account” because this is your top-level container for 1 or 100 different websites so it’s a good idea to name it something more general. The next step will ask you for your contact information which includes your first name, last name, phone number, and country. Easy so far right? :-)


Google Analytics Blogger Step 3
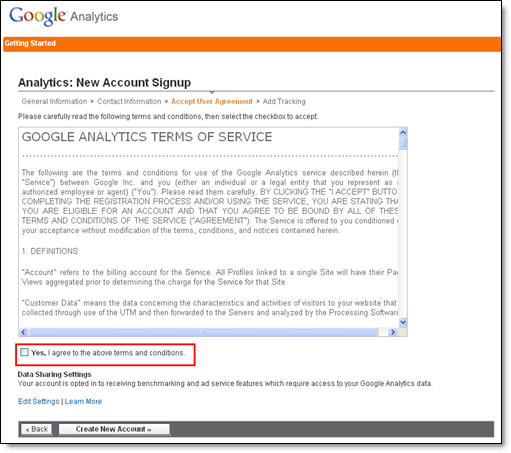
Your last step in signing up will ask you to accept the user agreement terms and conditions which you should read (just kidding…who actually ever reads these entire legal terms anyhow?).


Google Analytics Blogger Step 4
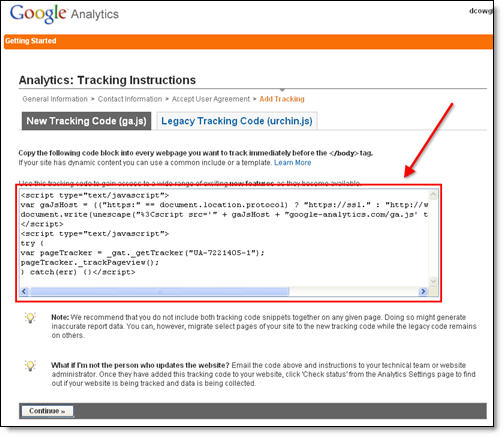
Now this next screen is very important. This is the code you will need to copy and paste into your blogger template. Go ahead and click into the box and it will automatically highlight the entire block of code for you. Now you need to copy that code and paste it into notepad or into a MS Word document. Save it as you’ll need to use it later.


Google Analytics Blogger Step 5
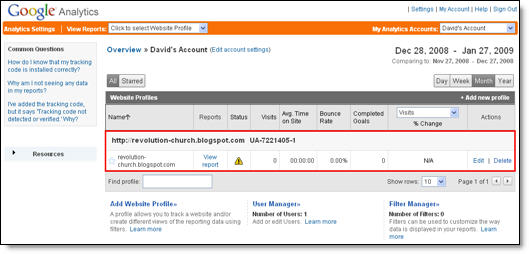
After you click on the “continue >>” button you will be taken to your brand new Google Analytics dashboard! You will see your blogger blog listed but with no analytical data….yet.


Google Analytics Blogger Dashboard
Ok, now you are done with setting up your Google Analytics account. The next step is placing the tracking code into your Blogger template so it can report back to Google Analytics and provide you with some cool data points.


Step #2 – Adding GA Tracking Code to Your Blogger Template

This is not a very difficult step even if you are afraid to touch your template code. Login to your Blogger account and then click on the “Layout” => “Edit HTML” tabs. This will bring you to the template code. Before you make any changes, I advice you to back up your template just in case there are any problems. After you’ve done so, continue reading.
Now in the edit template html code window, scroll all the way to the bottom of your template code and look for the tag. There should only be one of these closing tags in your template. If you can’t find it then your template wasn’t properly created and you should add one right above the tag.The tag should always be your last line of code in your template. It signifies the end of your template.
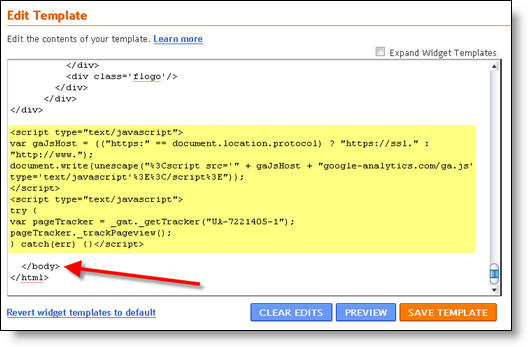
Ok, now go back to the code you saved before in a Word Doc from Google Analytics. You are going to copy it and paste it right above the tag as illustrated in the image below. The yellow highlighted code is the new GA code I just pasted into my template.


blogger google analytics code 2
Save your template and you shouldn’t get any error messages. If you do, it’s most likely not related to this GA code and something else with your template itself. Assuming you’ve been successful with your save, you are all done embedding the GA code in your template!


Step #3 – Confirm Google Analytics is Tracking

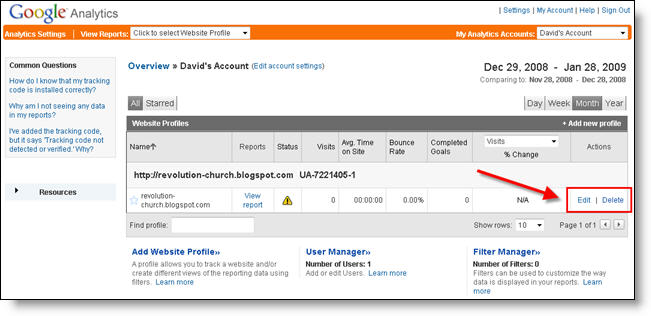
Go back into your Google Analytics account and look at your dashboard. Most likely you will see a little yellow exclamation mark under the “status” column that looks like this: google analytics tracking not installed. This means everything isn’t working properly yet which is fine because we are about to tell GA we just added the code. From your dashboard, click on the “edit” link which is located to the far right.


Google Analytics Blogger Dashboard Edit
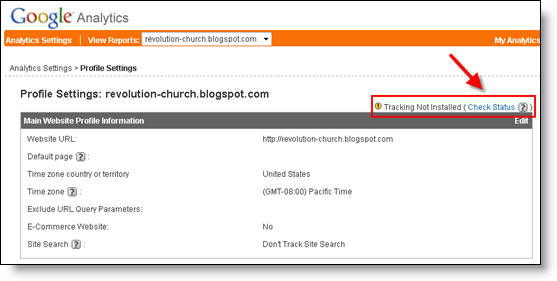
After you click on that link, you’ll see another screen like below. It will say “Tracking Not Installed” followed by a link “Check Status”. You’ll want to go ahead and click on that link which will tell GA to visit your site and look for the new code you just pasted in your template.


Google Analytics Blogger Dashboard Check Code
Assuming you pasted the code in there as instructed above, GA will find the new code and begin tracking everything on your blog. If you are still having problems, it’s most likely something to do with GA and you should read their help guide to troubleshoot your problem.


Google Analytics Blogger Dashboard Success
The message seen here, “Waiting for Data” means you have correctly setup GA and data is being gathered! Click on the top left Google Analytics logo and it will take you back to your dashboard. From there click on the “View report” link and that’s where all your very important Blogger visitor data will start appearing!


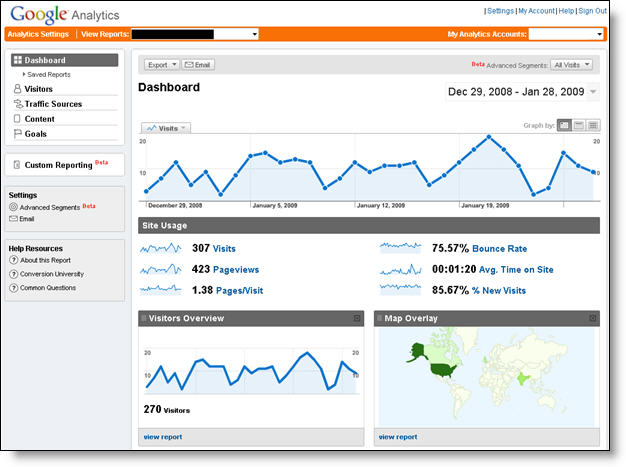
Google Analytics Blogger Dashboard Results
Now it usually takes an hour or so before you will see any data (maybe longer if you don’t get much traffic to your blog) so please be patient. Trust me, you’ll be logging in at least once a day just to see how much traffic your blog is getting. It’s very addicting and powerful information to learn from. You’ll be surprised which posts are your most popular and what countries people are coming from to read your blog.
Google Analytics is very powerful and we have just learned how to install it into your Blogger template. We haven’t even scratched the surface on the features and reporting it can do. For most Bloggers, this will be enough. Data will be collected and you will just review it. Others with more in-depth goals (like selling products or services, creating a sales funnel, etc) will want to spend more time learning GA. Hope you enjoyed the tutorial and don’t blame me for your new found addiction!
Ready to super charge your blog? Check out our professional premium blogger templates or make money by joining our blog affiliate program!


Source : eBlog

Read More..

Never Deleted Your Blog Account

Never, ever delete your old blog even if you have no use for it again, that is, unless you don’t mind having it taken over by blog spammers. There’s an ever increasing use of automated software that can detect when someone stops using a blog address and it WILL be taken over by assh%les that will try to capitalize on whatever traffic and incoming links you may have been receiving before you deleted it. The type of sites they will set up can vary anywhere from pornography, to illegal drug sales and casinos and just about anything else you can imagine. No one wants to see the their old blog address associated with these types of web sites, it can be rather embarrassing!


Just imagine your mom or friends or neighbors clicking on your old blog address expecting to find you and pictures of your kittens or newborn baby and spotting X-rated pornography instead! It’s best to just leave your old blog there with a forwarding link to your new location or if you want to become anonymous, don’t put anything. Just don’t delete it!

If this has already happened to you, I encourage you to Contact Blogger and report it as a Terms of Service violation, because link farms, porn sites and spam blogs are in clear violation of Blogger’s rules. If you are blog surfing and happen upon one of these sites that is clearly NOT a blog but is on a Blogger/Blogspot address, please report it. Blogger will investigate and pull the plug on it.

Sometimes, you will click a link or hit “Next Blog” and you’ll notice the page quickly change to a new location to a link farm or spam site, this is a redirect that the spammer has set up on their site to take you away from Blogger. Don’t let these people take over! If you see that kind of violation, report them vigorously!

source : blogflak
Read More..

[Viralink] Increase Page Rank

 Here's another tips for increase your page rank.
i found this article when i'm looking tips for increase my page rank.


How It Works
Just so it is easier to see how this actually works, below is an example of the linking tree. If 3 people copied the above grid into their own browser, added their link and 3 other people copied from them these are the number of backlinks which would be received witht he centre light green circle being this page.


bl1.gif
And if the procedure was repeated and each new person told 3 of their friends, the back links travel back to the source they were added!

bl2.gif
And once again as word gets around and the link tree develops the number of backlinks grows greatly! So at this stage my blog would have 93 backlinks from only 4 levels of "saturation" and by level 5 your blog will also have 93 backlinks if you decide to take part.

bl3.gif
Here are how the numbers add up, I will use the term saturation to describe the spread of the Viralink with Zero being your blog 1 being 1 link down, 2 being 2 links down and so on.
Saturation - Backlinks
0 - 0
1 - 3
2 - 12
3 - 39
4 - 93
5 - 336
6 - 1065
7 - 3252
8 - 9813
9 - 29,496
10 - 88,545
The above numbers rely on 3 people copying and pasting the Viralink onto their blog and that being replicated 3 times continuously 10 times. I think you will agree that the numbers are quite staggering, there are 119 spaces left on the Viralink from this page and I expect that there will be allot of clones which begin to pop up. The best strategy with this is to start early and tell all of your blog partners!
You may be wondering what happens if you are at the end of the chain when the Viralink is full ? What would be the benefit to me? Well there is no reason why you cant add another line of dots to the bottom and keep the process going, or even start another form scratch.


Here what you must do


———copy and paste the Viralink and instructions below this line———


Below is a matrix of 120 stars, I have already added a link to my blog onto one of the stars, all you need to do is copy and paste the grid into your blog and add your own link to one of the other spare stars, and tell others to do the same!

Viralink


When I receive a ping back once you have added the Viralink to your site I will add your link to this grid, and each person who copies the grid from here will also link to your site!


Rules

No Porn Sites
Only 1 link per person (i.e don't hog the viralink!)
Please don't tamper with other peoples url's

Enjoy!

———copy and paste the Viralink and instructions above this line———


Sumber : Andy Coates - Viralink
Read More..